Architecture Paint
Coating Specifications
- 1. For exterior walls
- 2. For interior walls and ceilings
- 3. For steel structures
- 4. Roofs and rooftops
- 5. For road surface markings
- 6. Water repellent agent
- 7. For wood
-
1. For exterior walls (concrete and cement mortar)
1) General coating finish
General coating finish Category Product name & Coating system Film Thickness Number of Coats Coating Method Color Remarks Water-based matte
60㎛
2 times
B, R, S
Designated color
Water-based high weather-resistant
10~15㎛
1 time
B, R, S
Clear
60㎛
2 times
B, R, S
Designated color
TOTAL
70~75㎛
Water-based high weather-resistant
10~15㎛
1 time
B, R, S
Clear
60㎛
2 times
B, R, S
Designated color
TOTAL
70~75㎛
Water-based gloss
10~15㎛
1 time
B, R, S
Clear
60㎛
2 times
B, R, S
Designated color
TOTAL
70~75㎛
Oil-based acrylic
60㎛
2 times
B, R, S
Designated color
Urethane system
30㎛
1 time
B, R, S
Clear
-
-
-
60㎛
2 times
B, R, S
Designated color
TOTAL
90㎛
2) Pattern coating finish
Pattern coating finish Category Product name & Coating system Film Thickness Number of Coats Coating Method Color Remarks Epoxy bone tile
40㎛
1 time
B, R, S
Clear
-
1 time
S
Designated color
60㎛
2 times
B, R, S
Designated color
TOTAL
100㎛
-
2. For interior walls and deilings
1) General coating finish
Category Product name & Coating system Film Thickness Number of Coats Coating Method Color Remarks Water-based matte
60㎛
2 times
B, R, S
Designated color
Water-based gloss
60㎛
2 times
B, R, S
Designated color
Water-based vinyl system
60㎛
2 times
B, R, S
Designated color
Condensation supplementation
10~15㎛
1 time
B, R, S
Clear
130㎛
2~3 times
B, R, S
Designated color
TOTAL
140~145㎛
Anti-graffiti
60㎛
2 times
B, R, S
Designated color
Antimicrobial paint
60㎛
2 times
B, R, S
Designated color
2) Pattern coating finish
Category Product name & Coating system Film Thickness Number of Coats Coating Method Color Remarks Bone tile
(Water-based)
30㎛
1 time
B, R, S
Designated color
-
1 time
S
Designated color
60㎛
2 times
B, R, S
Designated color
TOTAL
-
MULTI-COAT
(Oil-based)
30㎛
1 time
B, R, S
Designated color
-
1 time
S
Designated color
15㎛
1 time
B, R, S
Clear
TOTAL
-
MULTI-COAT (Water-based)
30㎛
1 time
B, R, S
Designated color
-
1 time
S
Designated color
15㎛
1 time
B, R, S
Clear
TOTAL
-
YEGREENA Elastomeric paint
10~15㎛
1 time
B, R, S
Clear
500㎛
1 time
S
Designated color
15㎛
1 time
B, R, S
Designated color
TOTAL
-
-
3. For steel structures
Category Product name & Coating system Film Thickness Number of Coats Coating Method Color Remarks Enamel system
35㎛
1 time
B, R, S
Designated color
60㎛
2 times
B, R, S
Designated color
TOTAL
95㎛
Ready mixed system
35㎛
1 time
B, R, S
Designated color
60㎛
2 times
B, R, S
Designated color
TOTAL
95㎛
Metallic paint
35㎛
1 time
B, R, S
Designated color
25㎛
1 time
B, R, S
Metallic silver
TOTAL
60㎛
Galvanized steel sheets
15㎛
1 time
B, R, S
Dark green
60㎛
2 times
B, R, S
Designated color
TOTAL
75㎛
Urethane system
50㎛
1 time
B, R, S
Reddish brown, Gray
60㎛
2 times
B, R, S
Designated color
TOTAL
110㎛
-
4. Roofs and rooftops
Category Product name & Coating system Film Thickness Number of Coats Coating Method Color Remarks Waterproofing (Water-based)
40㎛
1 time
B, R, S
Clear
1000㎛
4 time
B, R, S
Designated color
TOTAL
1040㎛
Slate, roof tile (Oil-based)
60㎛
2 times
B, R, S
Designated color
Slate, roof tile (Water-based)
60㎛
2 times
B, R, S
Designated color
-
5. For road surface markings (cement, asphalt)
Category Product name & Coating system Film Thickness Number of Coats Coating Method Color Remarks Acrylic system
DHW-8800, KS M 6080 Class 1
100㎛
1 time
B, R, S
Designated color
-
6. Water repellent agent
Category Product name & Coating system Film Thickness Number of Coats Coating Method Color Remarks Oil-based
-
-
B, R, S
Clear
Water-based
-
-
B, R, S
Clear
-
7. For wood
1) Wood clear coating (interior wood clear)
Category Product name & Coating system Film Thickness Number of Coats Coating Method Color Remarks Proxylin system paint
40㎛
2 times
B, R, S
Clear
30㎛
2 times
B, R, S
Clear
TOTAL
70㎛
2) Wood color coating (interior wood clear)
Category Product name & Coating system Film Thickness Number of Coats Coating Method Color Remarks Proxylin system paint
50㎛
2 times
B, R, S
White
50㎛
2 times
B, R, S
Designated color
TOTAL
100㎛
3) Red cedar and log house coating
Category Product name & Coating system Film Thickness Number of Coats Coating Method Color Remarks Stain
Permeated to surface
2 times
B, R, S
Designated color
Permeated to surface
2 times
B, R, S
Designated color
Information
Surface treatment
-
The most fundamental role of the surface treatment is to remove all foreign matter from the substrate, which could lead to early failure in the coating specification and to clean the substrate so that the paint is adhered well to the substrate.
The most important factor that determines the success or failure of the coating is the surface treatment.
Since the adherence between the paint and the substrate is reduced by foreign matter attached to the surface of the substrate, coating often becomes unsuccessful. For the surface treatment, there are mechanical and chemical methods. The mechanical method is generally used for the surface treatment in construction coating. The influence of the surface treatment on the coating effect is shown in the table below.The effect of each factor on the coating life upon coating
Factor Contribution rate (%) Surface treatment 50% Frequency of coating (difference between one and two coats) 20% Type of coating (difference between the same type of paints) 5% Others 25% ※ Others (coating environment, proficiency, etc.)
1. Concrete and Mortar
The parts made of cement accounts for the largest part of a building. Thus, among various paints, the paint that is applied to the cement parts is most frequently used. Since concrete and mortar contains moisture for a while after construction and also contains alkaline materials, care should be taken for moisture and alkali before coating.
(1) Moisture
The substrate must be sufficiently dried to be coated. Generally, the drying time of cement material is not prescribed, but as follows.
Construction Time Summer Spring & autumn Winter Concrete 21 days 21~28 days 28 days Mortar 14 days 14~21 days 21 days (2) Alkali
It is usually maintained at a pH of12 ~ 13 at the time of construction and gradually neutralized from the surface by carbon dioxide gas in the air during curing. However, the alkali component, which is not easily neutralized, migrates to the surface along with moisture remaining inside of the surface due to the shape or cracks of the structure and causes whitening, peeling and discoloration of the coating film. Usually, alkalinity should be a pH of 9.5 or less to be applied.
(3) Condition of the substrate to be coated
Upon using the mold, the release agent, sand powder, and laitance are factors that hinder the adhesion of paint, thus defective areas should be treated properly.
* Laitance: It is a weak concrete layer formed during coating on concrete as Ca(OH)₂ and CaCO₃ are present on the surface by the interaction of CaO in cement with water or carbon dioxide (CO₂).(4) Crack
Cracks caused by ambient temperature, humidity change, and other conditions should be filled in with the prescribed filler before coating. At this time, the product recommended by the manufacturer should be used.
(5) Concrete substrate adjustment
① Get rid of moisture in the dried and cured state of the substrate and remove other debris or extraneous matter. ② For the prevention of absorption, apply with a water-based sealer or an epoxy sealer, etc. ③ Fill the cracks and holes with cement, water-based caulking, putty, etc. ④ Polish the rough putty surface with sandpaper.
(6) Basics of concrete coating
① Investigate the quality of paints and become acquainted with how to use them. ② Arrange the substrate neatly and choose appropriate coating tools and equipment. ③ Use the paint after stirring it well. It is recommended to paint many thin coats instead of applying one thick coat. ④ Coat by avoiding dust, low-temperature, and high-humidity. ⑤ Avoid direct sunlight.
2. Steel
On the metal surface, oil, rust, mill scale and dust are always generated or adhered. According to the degree of surface treatment, the adhesion and durability of the coating film are greatly influenced, thereby determining the life of metal. Therefore, surface treatment is a very important coating pretreatment step. The better the surface treatment for the metal, the better the durability of the coating film even when the same paint is used. So, the prescribed surface treatment is essential for a good coating finish.
(1) Abrasives
Steel grit, shot and sand are suitable as abrasives used for blast. The abrasives that can form adequate surface roughness and that are clean and dry should be used.
The surface roughness according to the type and size of abrasives is presented in the following table.Type of Abrasives Maximum particle (mesh) Maximum surface roughness (μm) Sand Large 12 70 Medium 18 62.5 Small 30 50 Grit SAE G-50 25 82.5 G-40 18 90 G-25 16 100 Shot SAE G-230 18 75 G-330 16 82.5 G-390 14 90 (2) Surface roughness
The surface roughness is closely related to the surface treatment and should be specified in the coating specification separately from the surface treatment grade.
(3) Surface cleaning
In order to prevent any foreign matter from remaining on the blasted metal surface, vacuum cleaning and high-pressure dry air should be used to remove steel, grit, sand, dust, etc.
(4) Surface treatment specifications
For surface treatment specifications, the following SSPC, SIS, BS and NACE specifications should be followed.
Summary of surface treatment specifications
• Steel Structures Painting Council
• Swedish Standards Institution
• British Standards Institution
• National Association of Corrosion EngineersSSPC-SP1-63 Solvent cleaning Remove dust, soil, salt and contaminants by cleaning with solvent, steam, alkali, emulsion and water vapor. SSPC-SP2-63
SIS 05 5900Hand Tool Cleaning
B,C,D-St``2By using hand tools, chipper, descaler, sandpaper, wire brush and grinder, remove flaking rust, flaking mill scale and flaking coating film at the instructed level. SSPC-SP3-63
SIS 05 5900Power Tools
B,C,D-St``3By using power cleaning tools, chipper, escaler, sandpaper, wire brush and grinder, remove flaking rust, flaking mill scale and flaking coating film at the instructed level. SSPC-SP4-63 Flame Cleaning of New Steel Using flame cleaning, dry and remove rust, flaking mill scale and a slightly hard mill scale after flame cleaning and finish with a wire brush. SSPC-SP5-63
SIS 05 5900
BS 4232
NACE“White Metal” Blast Cleaning
A,B,C,D-Sa`3
Grade 1
NO.1Dry or wet blast cleaning by wheels or nozzles using sand, grit and shot removes 100% of all visible rust, mill scale coating and other foreign matter.
(For coating objects placed in a severely corrosive environment that may require high cleaning expenses).SSPC-SP6-63
SIS 05 5900
BS 4232
NACE“General” Blast Cleaning
B,C,D-Sa`2
Grade 3
NO.3Carry out blast cleaning for all visible residue on more than 67% of the surface area.
(For coating objects placed in a relatively severe exposure condition)SSPC-SP7-63
SIS 05 5900
NACE“Brush” Blast Cleaning
B,C,D-Sa`1
NO.4While evenly exposing a large number of stains on the entire metal surface, carry out blast cleaning for all excluding the tightly-adhering mill scale, rust and coating film. SSPC-SP8-63 Acid treatment Completely remove rust and mill scale by acid treatment, double acid treatment and electrolytic acid treatment. Smooth the surface. SSPC-SP9-63T After letting it sit for a while, blast clean In order to remove some or all of the mill scale, carry out blast cleaning with one of the above specifications after letting it sit. SSPC-SP10-63T
SIS 05 5900
BS 4232
NACE“Semi-White Metal” Blast Cleaning A, B, C, D-Sa 2½
Grade 2
NO.2Carry out blast cleaning for all visible residue up to 95% of the surface area as in white metal cleaning.
(For coating objects placed in high humidity, chemical environments, marine environment and other corrosive conditions)(5) Anti-corrosion grade of steel disc
Grade symbol Description of surface state A Mill scale is present on the entire surface B 50% of mill scale is eliminated, and red rust has started to generate C Almost all mill scale is eliminated, and there is a lot of red rust, but no pitting D Mill scale is completely eliminated, and there is pitting on the entire surface, while covered with hard red rust. (6) Minimum surface treatment by paint type
Paint type Minimum surface treatment Dry oil SSPC-SP 2 or 3 Alkyd SSPC-SP 6 Vinyl SSPC-SP 10 or 6 Chlorinated rubber SSPC-SP 10 or 6 Epoxy SSPC-SP 10 or 6 Coal tar epoxy SSPC-SP 10 or 6 Urethane SSPC-SP 10 or 6 Organic zinc SSPC-SP 10 or 6 Inorganic zinc SSPC-SP 10 or 6 3. Nonferrous metal
Nonferrous metals are less susceptible to corrosion than ferrous metals. If coating is necessary, the surface should be treated with a mechanical or chemical method to improve the adhesion of coating.
(1) Galvanized metal surface
White salt and other contaminants formed on the surface should be removed with solvent, and the surface should be treated with an etching solution or etching primer recommended in the coating specifications.
(2) Aluminum surface
The surface can be cleaned with a solvent. The parts other than the electrically treated should be blasted with a light abrasive or the recommended coating specifications should be referred to.
(3) Others
The surface should be cleaned with an appropriate solvent, and the recommended coating specifications should be referred to.
*. Etching Primer
Etching primer is also called a wash primer or a metal pretreatment paint and is also used as a pretreatment undercoat of a metal surface to be coated. It is used for improving coating adhesion or as a temporary anti-corrosive paint in some cases. As a 2K paint, polyvinyl butyral resin and zinc chromate are the main components, and as a solvent, butanol, isopropyl alcohol, etc. are used. Additives are composed of phosphoric acid and alcohols. Its function is to prevent the corrosion of steel surfaces by zinc chromate and phosphoric acid, and polyvinyl butyral resin reinforces the crosslinking reaction with phosphoric acid. In order to enhance the adhesive force between the top coat and the material, nonferrous metals such as aluminum and zinc are widely used.4. Wood
It is no exaggeration that the goodness and the badness of the coating are determined depending on the degree of substrate adjustment in wood painting.
(1) Substrate Sanding
It is effective to perform ground sanding by dividing it into two steps: rough sanding and finish sanding. For rough sanding, sandpaper #100~180 and for finish sanding, #320~400 are appropriate. The main purpose of rough sanding is to achieve the smoothness of the overall surface, and up to 80% of the entire sanding work should be completed at this step. The remaining 20% should be done by finish sanding to correct substrate flaws such as sanding marks of rough sanding, etc. If fine sandpaper is used from the beginning, bumps cannot be removed, and only the surface is polished, thus the overall smoothness cannot be obtained.
Carry out after placing a wooden block with a hard rubber or solid belt attached to sandpaper and make sure that the sanding direction is parallel to the wood grain.
If sanding is performed not following the wood grain, sanding marks will remain, and it is likely to cause stains upon coloring.
As a mechanical method, a face grinding machine such as a portable sander or a wide belt sander, etc. or a line grinding machine such as a drum sander, etc. is used.
It is usually preferable to make the wood somewhat thicker than when hand sanding is performed.
After finishing sanding, thoroughly clean the surface including inside pores by pumping compressed air. If abrasive residue remains, it often causes adhesion failure. Care should be taken not to make it dirty with bare hands after cleaning.(2) Wet Sanding
Small dents, scratches, adhesive stains, etc. cannot be sufficiently removed only by ground sanding. Thus, wet sanding should be carried out.
If water is applied to the surface, the materials of flaws or stains become clear, and blistering occurs. Then, if the surface is polished with sandpaper, defects are removed. Strong force should not be applied with this sanding. It is essential to lightly remove them by increasing the sanding time.*.Electric Sander: There are four motion types.
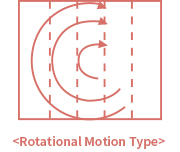
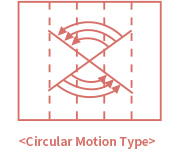
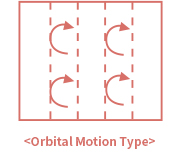
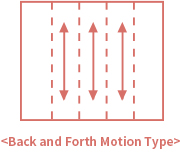
In order to prevent defects due to contaminants caused by surface oxidation, the coating object, for which the surface treatment has been done, should be coated within 5 hours after blast surface treatment and within 8 hours after other surface treatments, while not exceeding one day.
Coating method
-
Coating method
1. Preparation for Coating
Painting work should be carried out by complying with the technical data of the paint maker and other precautions. For multi paints, each paint should be sufficiently stirred and mixed according to the mixing ratio indicated in the product and technical data. If dilution is required, the specified thinner should be used. The dilution ratio can be adjusted according to the working conditions. Multi paints should be mixed beforehand, and the paints mixed with hardeners should be used within the pot life.
2. Coating Equipment and Coating Method
(1) Brush Coating
Even if the price of a roller or a brush is high, a good one should be purchased to make the work easier. The hair of a good brush is shiny, feels good, and does not bend well.
Additionally, the tips of the hair are arranged neatly, and the waist of the brush has appropriate elasticity. For water-based paints, a brush with long and soft hair and for oil-based paints, and a brush with relatively less strong hair should be used.1) Select an appropriate brush according to the characteristics of the paint to be applied and the substrate to be coated. 2) If a new brush is used, coat the brush with paint and rub it on a plank several times to neatly gather the brush ends to make brush dragging better before use. 3) Do not soak too much of the brush into the paint, but use after soaking about 60% of the brush into the paint. 4) Start to apply the paint required for a certain area properly. 5) Paint it evenly and widely after moderately applying the paint. 6) Finish smoothly so that brush marks do not remain. 7) As lacquer or quick-drying paint dries quickly, the motions in 4), 5), and 6) should be subsequently done almost at the same time.
(2) Roller Coating
When painting a large area such as ceilings or walls, the work speed of roller coating is faster than that of brush coating, and the paint can be applied evenly. Thus, even beginners can easily use it.
Moreover, it is convenient when painting ceilings or high walls because a long wooden bar handle can be attached freely.1) Put the paint into the tray and wet the roller about 1/2 with the paint. Then, rub the roller several times on the tray plate to coat the cover hair with sufficient paint. 2) Rub the roller on a flat surface, such as a veneer sheet, to soak the cover hair sufficiently with the paint. 3) Coat the roller uniformly with the paint by rubbing it on the tray plate after soaking it with the paint again and then start painting. 4) Lightly run the roller in a W-shape to distribute the paint evenly on the surface and spread the paint by overlapping the roller up and down. Then,run the roller in the same direction to remove the marks. 5) Since the roller cannot sufficiently reach the corners, it is better to coat the areas first with a brush and then the entire surface with the roller. 6) Since bubbles are likely to generate during roller coating, it is necessary to select a proper paint or thinner and adjust the viscosity.
(3) Air Spray Coating
This is a universal method to paint a large area. The air spray machine is simple and cheap, whereas the volume, pressure, and flow rate of the air must be appropriate to obtain a good film appearance.
If air spray coating is not done properly, there will be a great loss of paint. Moreover, the paint will protrude from the surface of the object, thereby resulting in a poor appearance.
In addition, if it is not operated properly, the coating surface will not be smooth, and the paint may run down, or pinholes may be formed in the coating film.
In terms of air spray coating, the most unfavorable condition is that it cannot be applied thickly with one coat because it needs to be diluted with a solvent to adjust the viscosity of the paint.1) As spraying left and right is easier, always take the object to the place where spraying can be done easily or make it move to such a position by itself. 2) On flat surfaces, spray the both ends on the left and right sides first and then proceed with spraying up and down. 3) When painting the ends, make sure that the center of the nozzle is aligned with the end line. 4) For large objects, start painting from the front and prevent dust from adhering to the back. 5) For angular objects, coat the angular parts first from a slightly closer distance and at a higher speed. 6) Prevent dust from settling into each part inside and apply in the same way as the flat surface. 7) For cylindrical objects, slowly apply up and down while rotating the object with a rotating platform. This will prevent stains from occurring. 8) For narrow objects, reduce the width of the pattern appropriate for the object.
By doing so, coating will be finished neatly without wasting any paint. 9) For quick-drying paints such as lacquer, spray as continuously as possible. Otherwise, dust will settle on the dried surface, thereby resulting in a poor appearance.(4) Airless Spray Coating
In this method, air is not directly mixed into the paint to spray the paint. The ejection method is to eject the paint through a special nozzle or tip using pressure. The magnitude of the pressure used is calculated by comparing the ratio of the air pressure of the pump for the internal air pressure. The pressure ratio of the pump is from 20:1 to 60:1, but a ratio of 30:1 is usually used. For zinc dust paints, especially inorganic zinc dust paints, a ratio of 45:1 should be used.
Compared to air spray coating, some of the most important advantages is that there is a small loss of paint, toxicity can be reduced, and there is a low risk of explosion.
Also, since a small amount of solvent can be used upon ejecting the paint, coating in a thick wet film thickness is possible. As already described, the ejection of the paint depends on the type of the tip that is specially designed.
The tip or nozzle is made of tungsten carbide, and the amount of injection depends on the diameter of the nozzle.
Therefore, there are many types of tips with various angles and different diameters.
The selection of tip should be made based on the pressure according to the paint injection amount and on the diameter of the nozzle that maintains a constant ejection amount.
Namely, the speed at which the paint is ejected determines the film thickness of the paint. The angle of the tip is selected according to the width of the object to be coated.
A tip with a nozzle diameter of 0.009″ to 0.013″ is suitable for coating approx. 50μ (2mil) of wet film. In addition, a tip with a nozzle diameter of 0.013″ to 0.019″ is suitable for 100~200μ (4~ 8mil), while a tip with a nozzle diameter of 0.019″ to 0.031″ is suitable for 200μ (8mil) or larger.
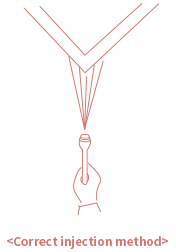
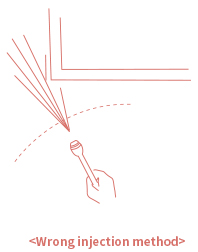
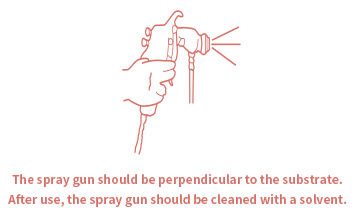
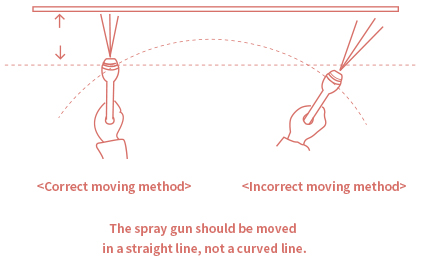
For paints that should be applied very thickly, a tip with a nozzle diameter of 0.040″ to 0.060″ should be used.1) For the airless sprayer, the spray pattern, shape, and paint injection amount are all determined by the nozzle tip. 2) Maintain a proper injection distance. 30㎝ is appropriate in general. If the distance is short, the coating becomes thick. Whereas, if the distance is far, uniform coating is difficult, and a large amount of paint is wasted. 3) The spray gun should be perpendicular to the substrate. 4) The spray gun should be moved in a straight line, not a curved line. 5) The moving speed of the spray gun should be about 40~80㎝ per second to obtain proper and uniform coating. 6) For the spray pattern, double coating at around 1/3 to 1/4 is suitable to obtain proper and uniform coating. 7) The pressure should be adjusted appropriately to obtain uniform coating. 8) The equipment should be cleaned with a specified cleaning agent immediately after use.
Proper Use Method of Coating Gun
3. Coating Conditions
(1) Temperature and Humidity
In general, the appropriate coating temperature range is between 10℃ and 30℃. It is advisable not to paint at temperatures below 5℃ or above 40℃.
If the surface temperature is high, the coating film may dry too quickly, thereby resulting in defects such as pinholes or blisters. In the case of low temperatures, not only slow curing, but also incomplete curing may be caused.
To prevent surface condensation during coating, the temperature of the steel surface should be more than 2.7℃ above the dew point.
When the humidity is high, the drying time is considerably delayed in the case of a paint that is generally dried by solvent evaporation.
Particularly, in the case of water-based paints, coating should be avoided at a humidity of 85% or higher.
Reactive paints are generally less susceptible to humidity, but sensitive to temperature.
In general, the optimum humidity range for coating is between 40% and 80%.(2) Others
Outdoor painting should be avoided on foggy, rainy or strong windy days.
In order to maximize the efficiency of work at the workplace, each employee should be familiar with the work of the workplace, and the special rules for the workplace described below must be followed.1) Keep the finishing material of the work in a place that can be protected from fire. 2) Always carry out the work safely. 3) In case of an accident, immediately call for first aid. 4) Modify and report what is considered unsafe. 5) Be aware of the heavy weight being applied when lifting or bending the knee. 6) An explosion-proof lamp and an enclosed switch should be used in the warehouse. 7) Product labeling should be appropriate and attached accurately. 8) Finishing materials should not be stored without an adequate cover in storage rooms. 9) Floors, walls, ceilings and painting rooms should be cleaned regularly. 10) Protective gear must be prepared and kept in good condition.